Simple Web 2.0 Logo
This tutorial is very simple to complete but still gives a nice finish to a cool Web 2.0 style logo for a website etc…only takes around 5 minutes to complete and shows some good techniques which can be used in the future when designing other Web 2.0 Style objects.
Step 1 - Open a New Document
First of all open up a new document size around 500 x 250 and the background filled with black.
Step 2 - Write Text
Now choose the Type/Text Tool and write out the name of your website or the word you are going to use (I am using the word Photoshop as I normally do and the font “Impact”), when it is written resize to the desired size and put it in the centre of the canvas as shown below:
Step 3 - Apply Blending Options
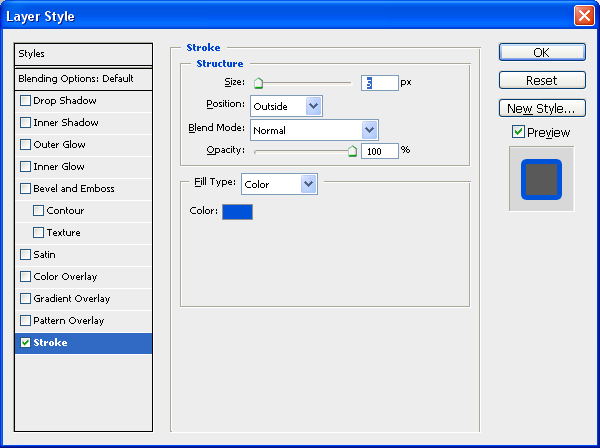
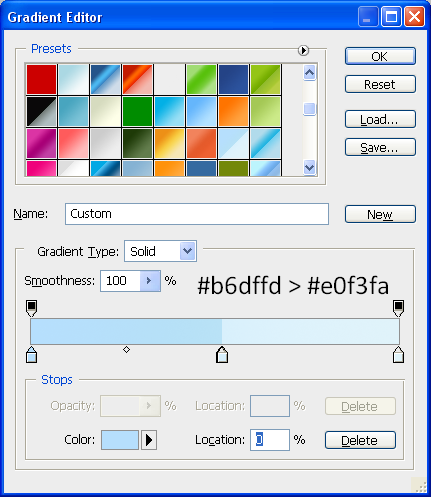
Now simply double click on the text layer and the blending options menu will appear use the settings as shown below to achieve the right outcome:
Stroke:
Colour used for the stroke is: #0052D9
Gradient:
(Other colours can be used, play around with different colours until you get the ones your looking for)
Once the blending options have been applied you will have an image similar to the one shown below (unless you have used different colours etc…)
Step 4 - Add Image/Icon
You can also add images/icons aswell to play around with how the final logo looks in this tutorial I am going to add a Paint icon behind my text which is available below:
Paint Icon:
Step 5 - Finishing Touches
To finish just add some finishing touches like a glow in the background for example and a reflection as shown how to do HERE after you have messed around for a while and are happy with the outcome you will have something similar to below:
Finished Image:
If you have had any problems with this tutorial then don’t hesitate to contact me and I will get back to you as soon as I can.


These are great, very handy!
Thanks